[ 12일차 ] cisco packet tracer 에서 여러가지 설정하기 +라우터 CLI 실습하기+cmd명령어, dhcp 설정하기
1 호스트 이름 변경
Router(config)#hostname ICQA
end로 프리빌리지 모드로 돌아와서 저장하기
ICQA#copy r s
Destination filename [startup-config]?
Building configuration...
[OK]
2 배너 만들기
ICQA>en
ICQA#conf t
Enter configuration commands, one per line. End with CNTL/Z.
ICQA(config)#banner motd #
Enter TEXT message. End with the character '#'.
BANNER ~~
#
ICQA(config)#exit
ICQA#
%SYS-5-CONFIG_I: Configured from console by console
ICQA#exit

3 프리빌리지 모드 암호 설정
ICQA(config)#enable password 1234
ICQA(config)#end
ICQA#
%SYS-5-CONFIG_I: Configured from console by console
ICQA#copy r s
Destination filename [startup-config]?
Building configuration...
[OK]

4 이더넷 포트 ip 부여하기
5 프리빌리지 모드로 이동 -> 구성모드로 이동
6 저장하기
ICQA#write
Building configuration...
[OK]
ICQA#
ICQA#copy running-config startup-config
Destination filename [startup-config]?
Building configuration...
[OK]
7 ram 내용 확인하기
show run
8 시리얼포트에 ip부여, 활성화, 속도, 대역폭

ICQA(config)#int fa0/0
ICQA(config-if)#ip address 192.168.100.1 255.255.255.128
ICQA(config-if)#no shutdown
ICQA(config)#int s0/3/0
ICQA(config-if)#ip address 172.16.10.1 255.255.0.0 - 시리얼포트 ip부여하기
ICQA(config-if)#clock rate 64000 --속도 설정하기
ICQA(config-if)#bandwidth ?
<1-10000000> Bandwidth in kilobits
ICQA(config-if)#bandwidth 10000 -- 대역폭 설정하기
9 enable secret 암호설정
ICQA(config)#enable secret 1111
ICQA(config)#end
ICQA#
%SYS-5-CONFIG_I: Configured from console by console
ICQA#copy r s
Destination filename [startup-config]?
Building configuration...
[OK]
10 텔넷 설정하기
ICQA(config)#line vty 0 4
ICQA(config-line)#password 3333
ICQA(config-line)#login
ICQA(config-line)#end
ICQA#
%SYS-5-CONFIG_I: Configured from console by console
ICQA#copy r s
Destination filename [startup-config]?
Building configuration...
[OK]
**저장을 꼭 해줘야 암호적용이 된다
11 콘솔 설정하기
ICQA(config)#line con 0
ICQA(config-line)#password 5555
ICQA(config-line)#login
end ~ copy r s

왼쪽 라우터
Router>en
Router#conf t
Enter configuration commands, one per line. End with CNTL/Z.
Router(config)#int s0/3/0
Router(config-if)#ip address 203.100.100.1 255.255.255.224
Router(config-if)#clock rate 64000
Router(config-if)#no shutdown
Router(config-if)#end
Router#
%SYS-5-CONFIG_I: Configured from console by console
Router#copy r s
Destination filename [startup-config]?
Building configuration...
[OK]
------- 텔넷 암호 1234 부여하기
Router(config)#line vty 0 4
Router(config-line)#password 1234
Router(config-line)#login
Router(config-line)#end
Router#copy r s
Destination filename [startup-config]?
Building configuration...
[OK]
-----본인 이름으로 배너 만들기
Router(config)#banner motd #
Enter TEXT message. End with the character '#'.
OH HEE WON
#

-----콘솔 암호 1234 부여하기
Router(config)#line con 0
Router(config-line)#password 1234
Router(config-line)#login
Router(config-line)#end
Router#
%SYS-5-CONFIG_I: Configured from console by console
Router#copy r s 안해주면 show run에는 보이지만 show startup-config 에는 보이지않음
vram에 저장이 안되었다는 의미 !
-----세션 설정시간 1분 10초
Router(config)#line vty 0 4
Router(config-line)#exec-timeout 01 10
-----loopback 0 을 설정하고 ip 200.200.200.1 /27을 부여하고 활성화 하시오
Router(config)#int loopback 0
Router(config-if)#ip address 200.200.200.1 255.255.255.224
Router(config-if)#no shutdown
-----interface에 대한 정보를 확인하시오
Router#sh interfaces
Router#sh processes (프로세스 정보확인)
Router#sh ip route (라우터테이블 정보확인)
----- 라우터의 역할
1) 경로설정 2)패킷전송
-----스위치의 역할
1) 다중연결(멀티포트) 2)증폭
----- IPX, Appletalk 은 OSI 7 계층중 3계층이다
-----하나의 인터페이스에 IP 두개 넣기
fa0/0 192.168.10.3 /25
192.168.20.4 /25
Router(config)#int s0/3/0
Router(config-if)#ip address 192.168.10.3 /25 255.255.255.128
Router(config-if)#ip address 192.168.20.4 /25 255.255.255.128 s (두번째ip)
오른쪽 라우터
Router>en
Router#conf t
Enter configuration commands, one per line. End with CNTL/Z.
Router(config)#int s0/3/0
Router(config-if)#ip address 203.100.100.2 255.255.255.224
Router(config-if)#no shutdown
Router(config-if)#end
Router#
%SYS-5-CONFIG_I: Configured from console by console
Router#copy r s
Destination filename [startup-config]?
Building configuration...
[OK]
<cmd>
ns lookup naver.com
tracert(traceroute)naver.com
윈도우에서는 줄여서쓰고 리눅스에서는 풀로 traceroute 써준다
경로를 확인해주는 명령어
만료가 되었다고 나오는건 방화벽으로 막아놓은것이다

192.168.0.1 우리 게이트웨이
106.243.156.33 처음 만나는 라우터
tracert 164.124.101.2 (ns.lgtelecom.com)

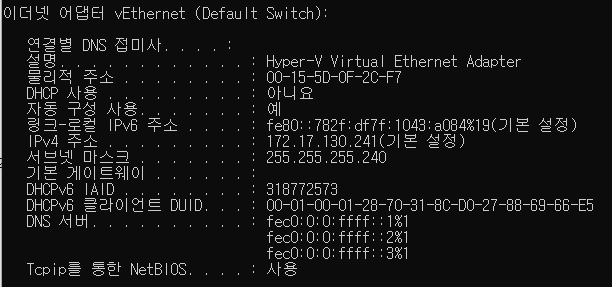
ipconfig
pc의 ip정보가 나온다
ipconfig/all 하면 상세정보 mac주소까지 나온다
물리적 주소 . . . . . . . . : 00-15-5D-0F-2C-F7
*dhcp 서버는 pc, 라우터에서 설정할 수 있다
[4주차 라우터 ppt]
p 43 dhcp

Router>en
Router#conf t
Router(config)#int fa0/0
Router(config-if)#ip address 192.168.1.1 255.255.255.0
Router(config-if)#no shutdown
Router(config)#ip dhcp excluded-address 192.168.1.1 -- 예외주소1
Router(config)#ip dhcp excluded-address 192.168.1.2 --예외주소1
Router(config)#ip dhcp pool dhcp_pool --dhcp pool이름을 부여한다
Router(dhcp-config)#default-router 192.168.1.1 --게이트웨이를 설정한다
Router(dhcp-config)#network 192.168.1.0 255.255.255.0 --네트워크를 설정한다
Router(dhcp-config)#dns-server 203.248.252.2